

Deploy Power Pages secrets with Azure DevOps and deployment profiles


Photo by OWN FILTERS on Unsplash
Microsoft provides excellent resources for learning, using, and building on top of its products. Usually, you can search for how to do something within a Microsoft product or service and you'll get a handful of Microsoft Learn resources that will walk you step-by-step through the exact configuration needed. Unfortunately, however, these resources can sometimes have gaps that may lead to unexpected results. This is what happened in my case, so I've written this guide as a cautionary tale so that you can avoid the same pitfalls I encountered, while also gaining a deeper understanding of how Power Pages websites are updated when changes are deployed.
Note: this article builds off of my previous article on Using source control with Azure DevOps and Power Pages websites, so you should check that out before continuing with this article if you haven't already.
Secrets? What secrets?
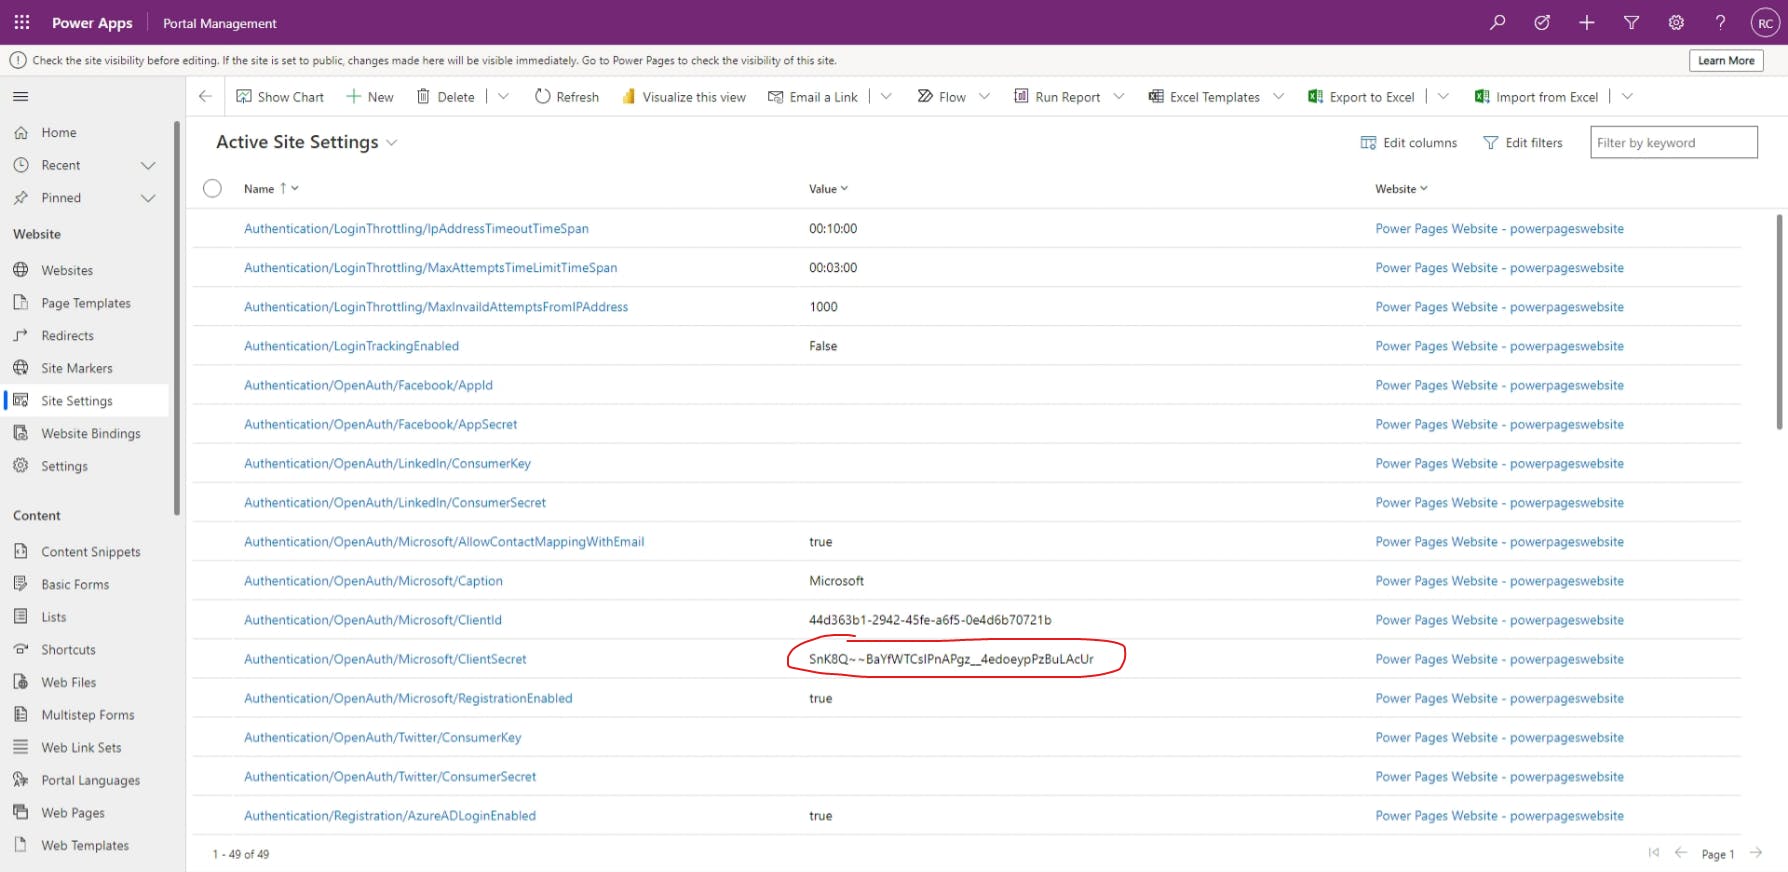
While it may not be immediately apparent when working with a Power Pages website, many of the site settings are sensitive values that should not be checked into source control and should be stored securely, just like your passwords. The common site settings, along with their site setting Names, that need to be handled carefully are:
Facebook App Secret (
Authentication/OpenAuth/Facebook/AppSecret)LinkedIn Consumer Secret (
Authentication/OpenAuth/LinkedIn/ConsumerSecret)Microsoft Client Secret (
Authentication/OpenAuth/Microsoft/ClientSecret)Twitter Consumer Secret (
Authentication/OpenAuth/Twitter/ConsumerSecret)Azure Blob Storage Connection String (
WebFiles/CloudStorageAccount)Any other secrets used to access third-party APIs
To view these and all other site settings, go into your Portal Management app and select Site Settings from the sidebar menu.
How do these secrets get exposed?
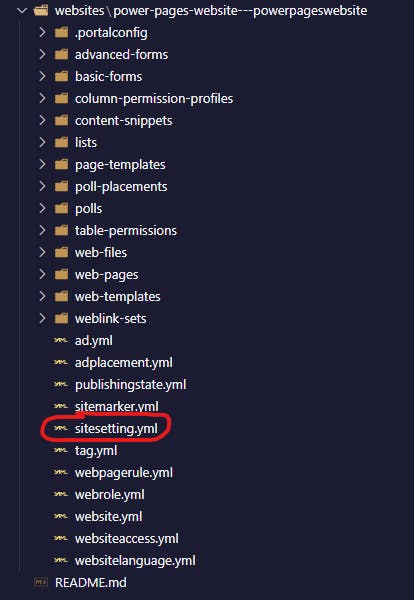
If your website is only being stored within one Power Platform environment, which I would strongly discourage, or if you are manually uploading your website content from one environment to another, then there is little to no risk of these secrets being exposed unless someone gains access to your computer or the Power Platform environment directly. However, if you have configured a DevOps deployment pipeline, or at least source control (i.e. Git), then there is a sitesetting.yml file containing all of these site settings along with their values being checked into your repo right now!
Wonderful 😒. Now what?
Now that you understand what sensitive values are being stored, where they're located in your files, and how they can end up being exposed, let's walk through the process for excluding them from source control while preserving the ability to modify the site settings across multiple Power Platform environments. To accomplish this, we'll need to perform the following steps:
Exclude site settings from source control
Add
sitesetting.ymlto the Azure DevOps pipelineCreate a new Azure DevOps pipeline
Add sensitive site settings as pipeline variables
Configure deployment profiles
Exclude site settings from source control
Within the root of your Power Platform repo (i.e. ~/Documents/Power_Platform_DevOps ), open the .gitignore file (or create one if it doesn't already exist) and add the following lines:
# Power Pages site settings (wildcard catches multiple websites' settings)
websites/**/sitesetting.yml

# While we're here, let's also add the environment-specific manifest file
websites/**/.portalconfig/*-manifest.yml
# Reference: https://learn.microsoft.com/power-pages/configure/power-platform-cli#environment-manifest-file-org-url-manifestyml
With those lines added, save the file and you should see that the sitesetting.yml file (along with the environment-specific manifest file) are now being ignored by Git. At this point, you can now safely check your repo into source control without worrying about exposed secrets. However, this also means that the target environments won't receive any updates to these values, nor will you be able to manage each environment's settings in code. To do this, we'll use Azure DevOps pipeline secure files and variables.
Add sitesetting.yml to the Azure DevOps pipeline
It is necessary to still deploy the sitesetting.yml file along with your other Power Pages website content files because otherwise, Power Pages will ignore any site setting changes you try to make. So to do this, we will leverage a feature within Azure DevOps called secure files.
Within your Azure DevOps project (i.e. https://dev.azure.com/powerplatformdevops2023/Power_Platform_DevOps), navigate to Pipelines > Library > Secure files and select + Secure file.
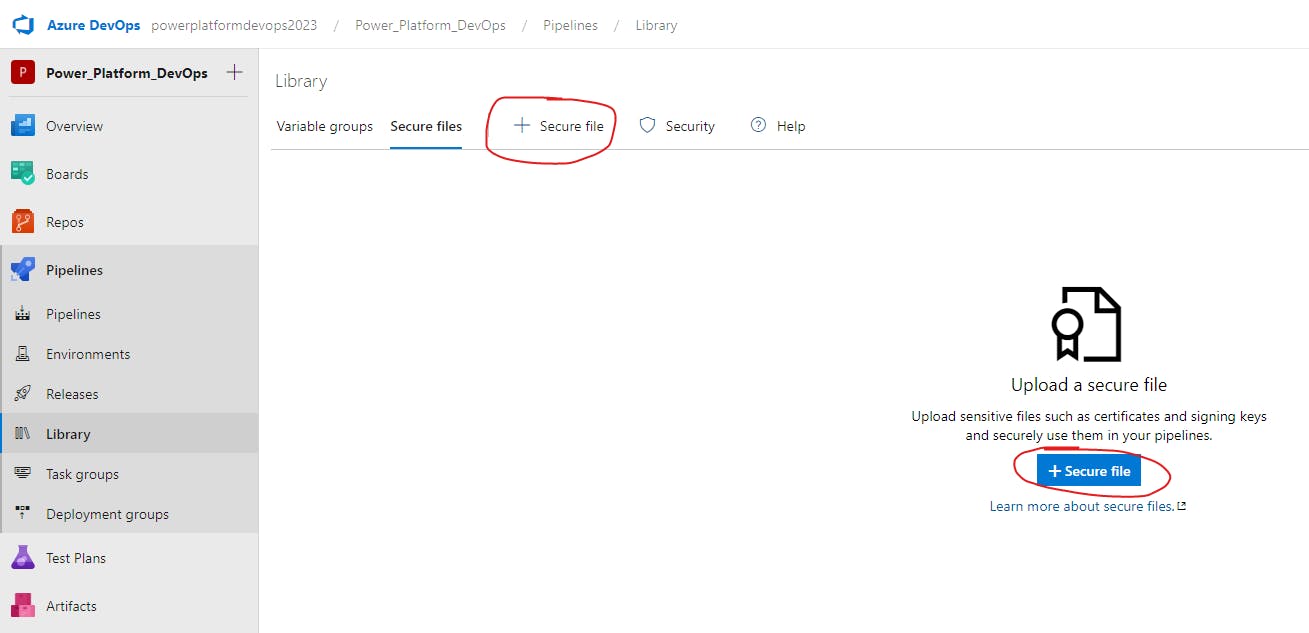
From here, select and upload the sitesetting.yml file from your local repo.
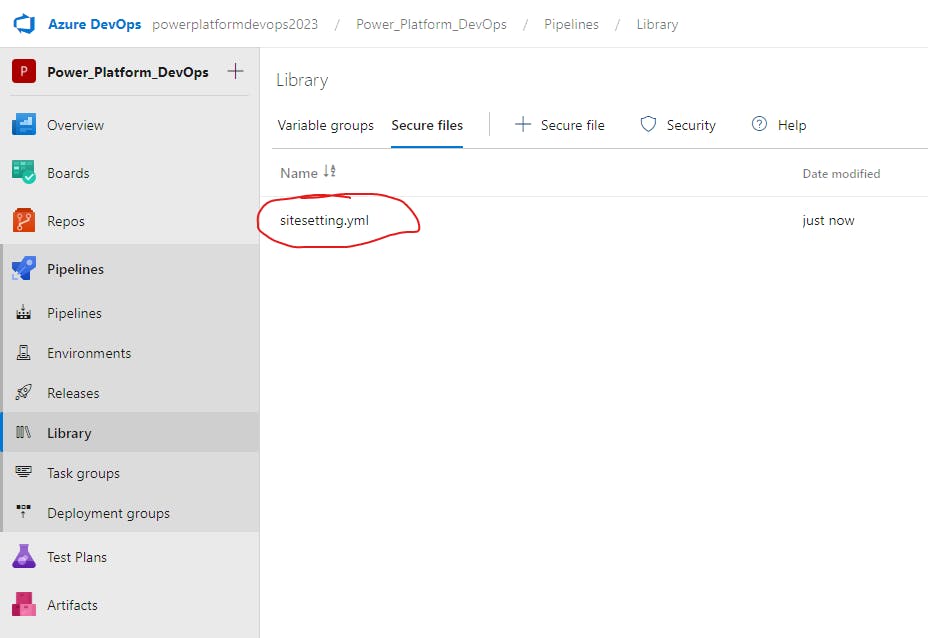
Uploading this file into the pipeline library doesn't automatically add it to your files during deployment, so we'll need to add this as a task in our deployment pipeline later on.
Create a new Azure DevOps pipeline
Now that we have our sitesetting.yml file ready to deploy along with the rest of our website content files, let's create the Azure DevOps deployment pipeline.
Note: if you don't already have multiple Power Platform environments, you can still follow along by configuring the deployment pipeline to deploy back to your source environment. Since that's where the changes are coming from, there shouldn't be any issue.
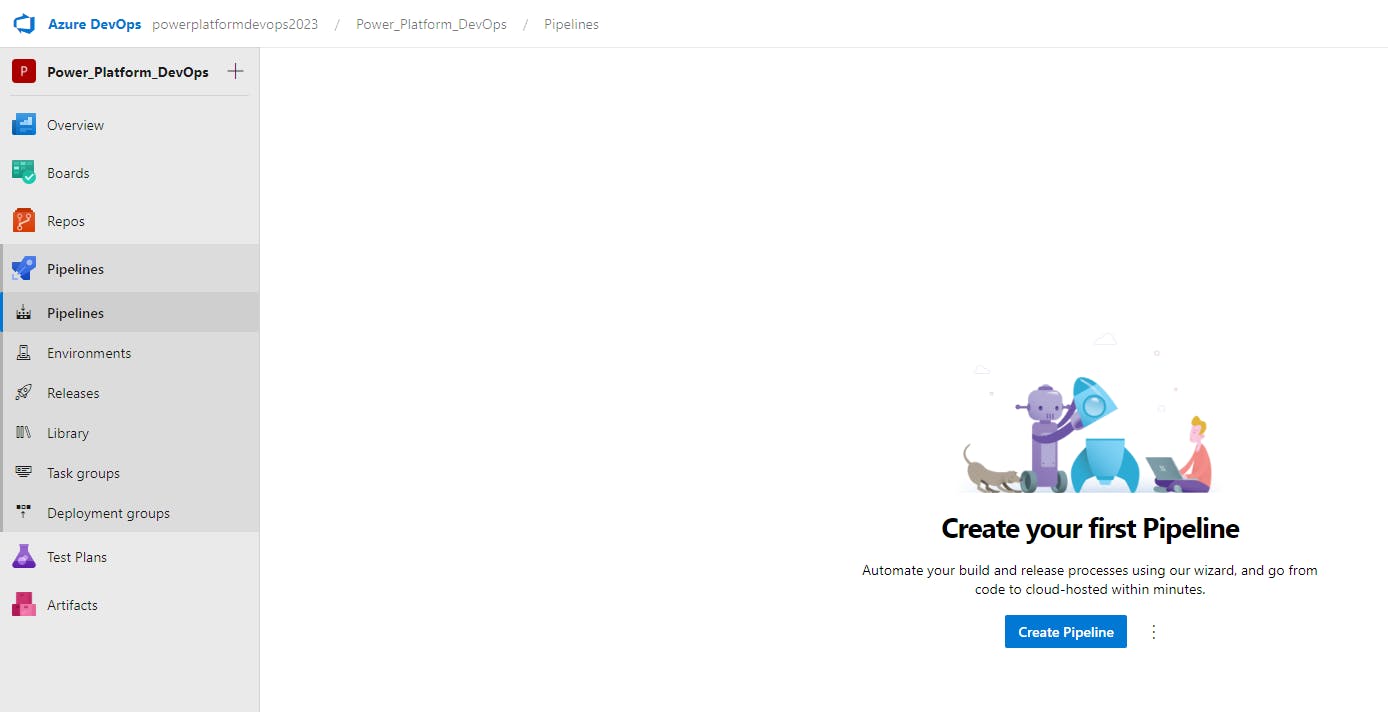
Still within the Pipelines section of your Azure DevOps project, let's go to Pipelines and select Create Pipeline.
From here, choose the following options:
Azure Repos Git
Repo name (i.e.
Power_Platform_DevOps)Starter pipeline
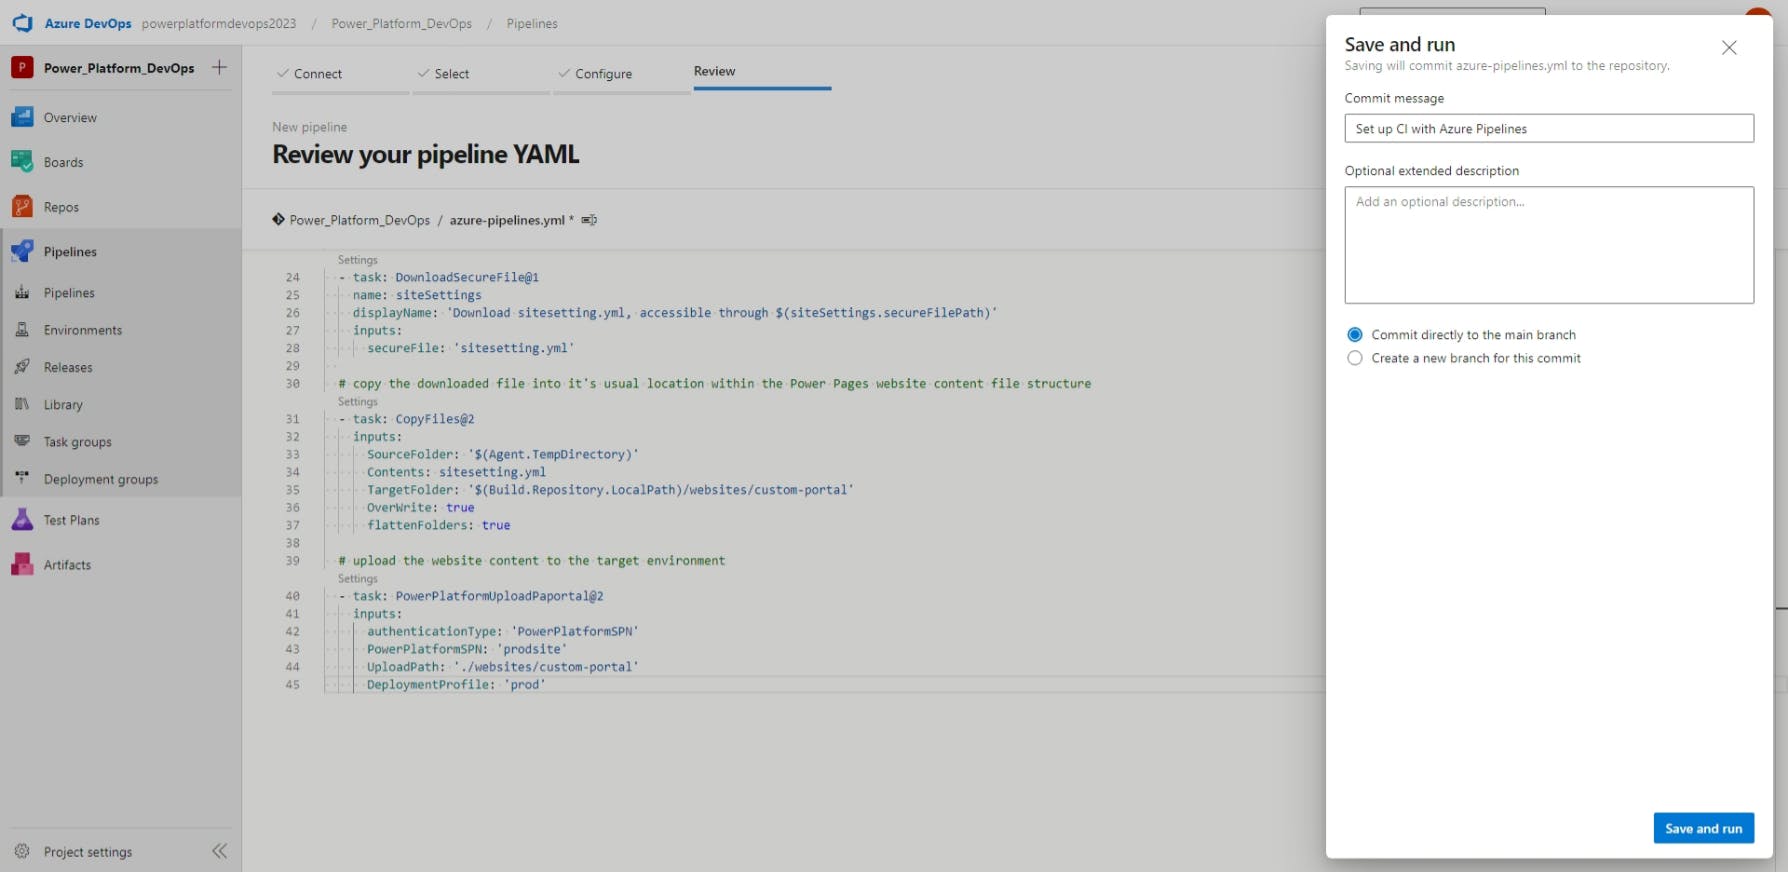
This should create a new azure-pipelines.yml file at the root of your project repo. With this file open in Azure DevOps, replace the default code with the following:
# only run pipeline for changes within the 'websites' folder, and only on the 'main' branch of the repo.
trigger:
  branches:
    include:
      - main
  paths:
    include:
      - websites/*

# use a Windows VM, as it is necessary for the Power Platform Tools
pool:
  vmImage: windows-latest

steps:
  # checkout the repo
  - checkout: self

  # install the Power Platform tools (required before running Power Platform tasks)
  - task: PowerPlatformToolInstaller@2
    inputs:
      DefaultVersion: true

  # download the secure 'sitesetting.yml' file into the pipeline's local files (disposed of after the run)
  - task: DownloadSecureFile@1
    name: siteSettings
    displayName: 'Download sitesetting.yml, accessible through $(siteSettings.secureFilePath)'
    inputs:
      secureFile: 'sitesetting.yml'

  # copy the downloaded file into it's usual location within the Power Pages website content file structure
  - task: CopyFiles@2
    inputs:
      SourceFolder: '$(Agent.TempDirectory)'
      Contents: sitesetting.yml
      TargetFolder: '$(Build.Repository.LocalPath)/websites/custom-portal'
      OverWrite: true
      flattenFolders: true

  # upload the website content to the target environment
  - task: PowerPlatformUploadPaportal@2
    inputs:
      authenticationType: 'PowerPlatformSPN'
      PowerPlatformSPN: 'prodsite'
      UploadPath: './websites/custom-portal'
      DeploymentProfile: 'prod'
Note: this pipeline requires the Power Platform Build Tools to be added to Azure DevOps, as well as a service connection to your target environment. See Get Microsoft Power Platform Build Tools for instructions on how to configure both.
With our pipeline code added, let's Save and run. If you have branch security enabled, you may need to Create a new branch for this commit and then submit a pull request (PR). Otherwise, we can Commit directly to the main branch.
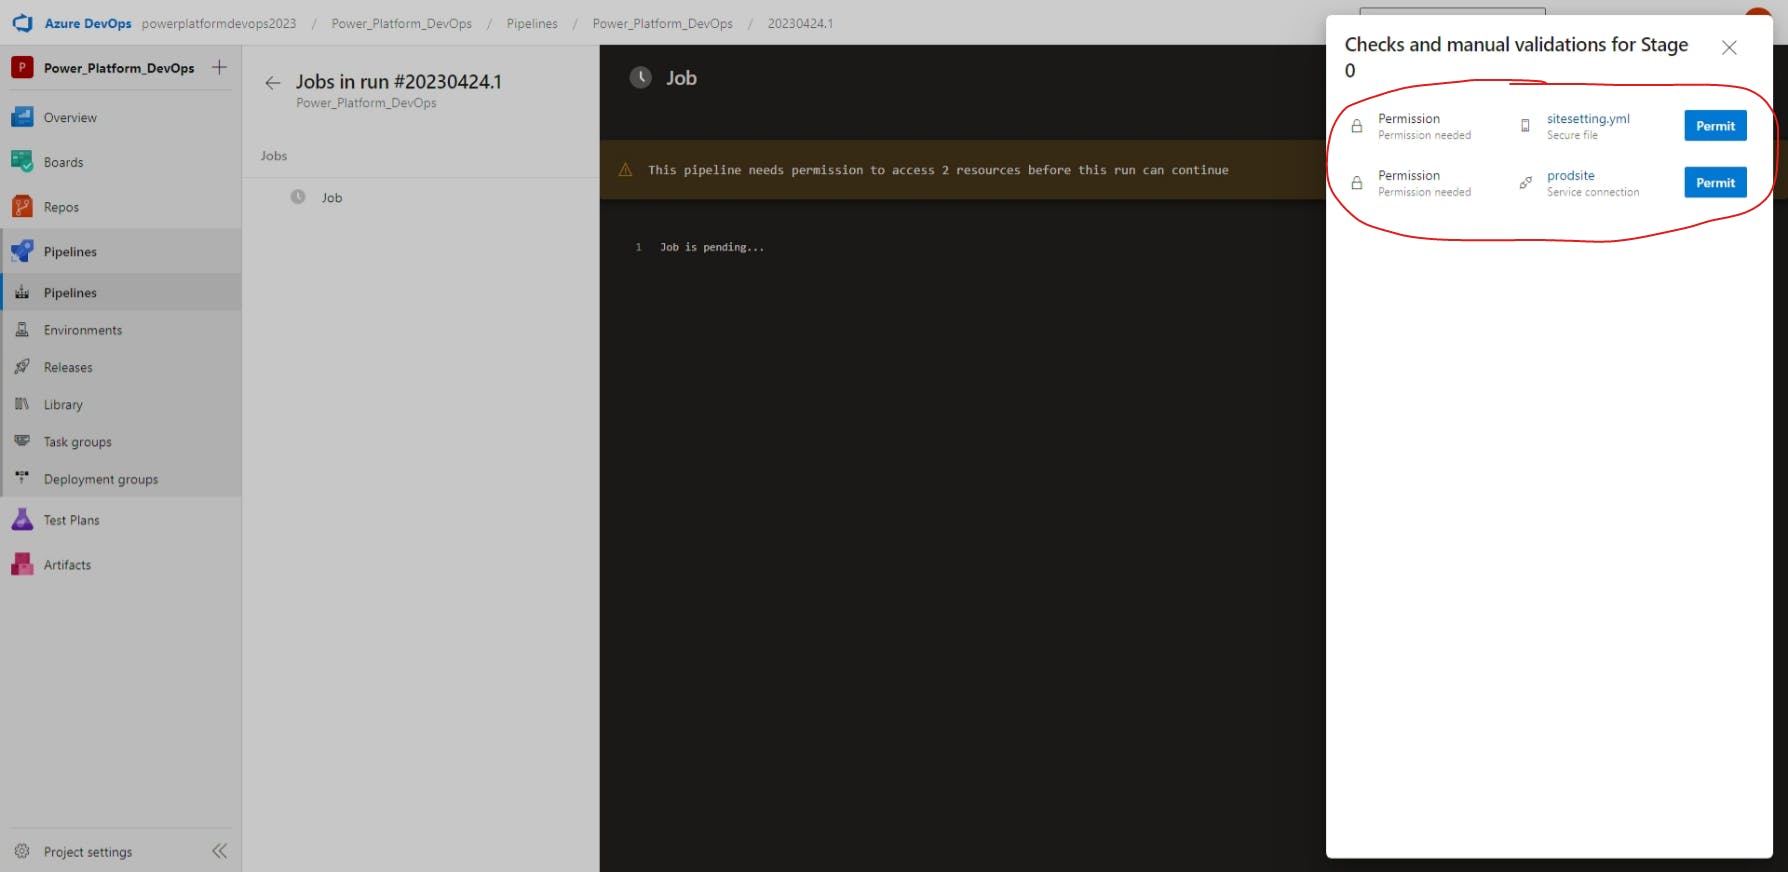
If this is a new pipeline, you'll also need to grant access to the secure file and the service connection to the pipeline.
Once you've granted access, your pipeline will now run, deploying any website changes from your source environment to your target environment, including any site settings in the sitesetting.yml file. However, with our current setup, we would have to upload a new sitesetting.yml file before every deployment if we need to make any changes to our site settings. Let's fix that in the next couple of steps.
Add sensitive site settings as pipeline variables
Now that we have our pipeline set up, let's add some environment-specific variables that we can then use in the next step to adjust our site settings to match each environment's configuration. This is necessary for multiple reasons, such as using a different Microsoft Azure app registration ID and secret, or a different Azure Blob storage account for each environment.
Still within our pipeline, select Edit and then select Variables > New variable.


Let's take our Microsoft client ID, which can be copied from the Site Settings in the Portal Management app or from within the sitesetting.yml file of our repo, and save it in a variable named "ProdMicrosoftClientId", like so:
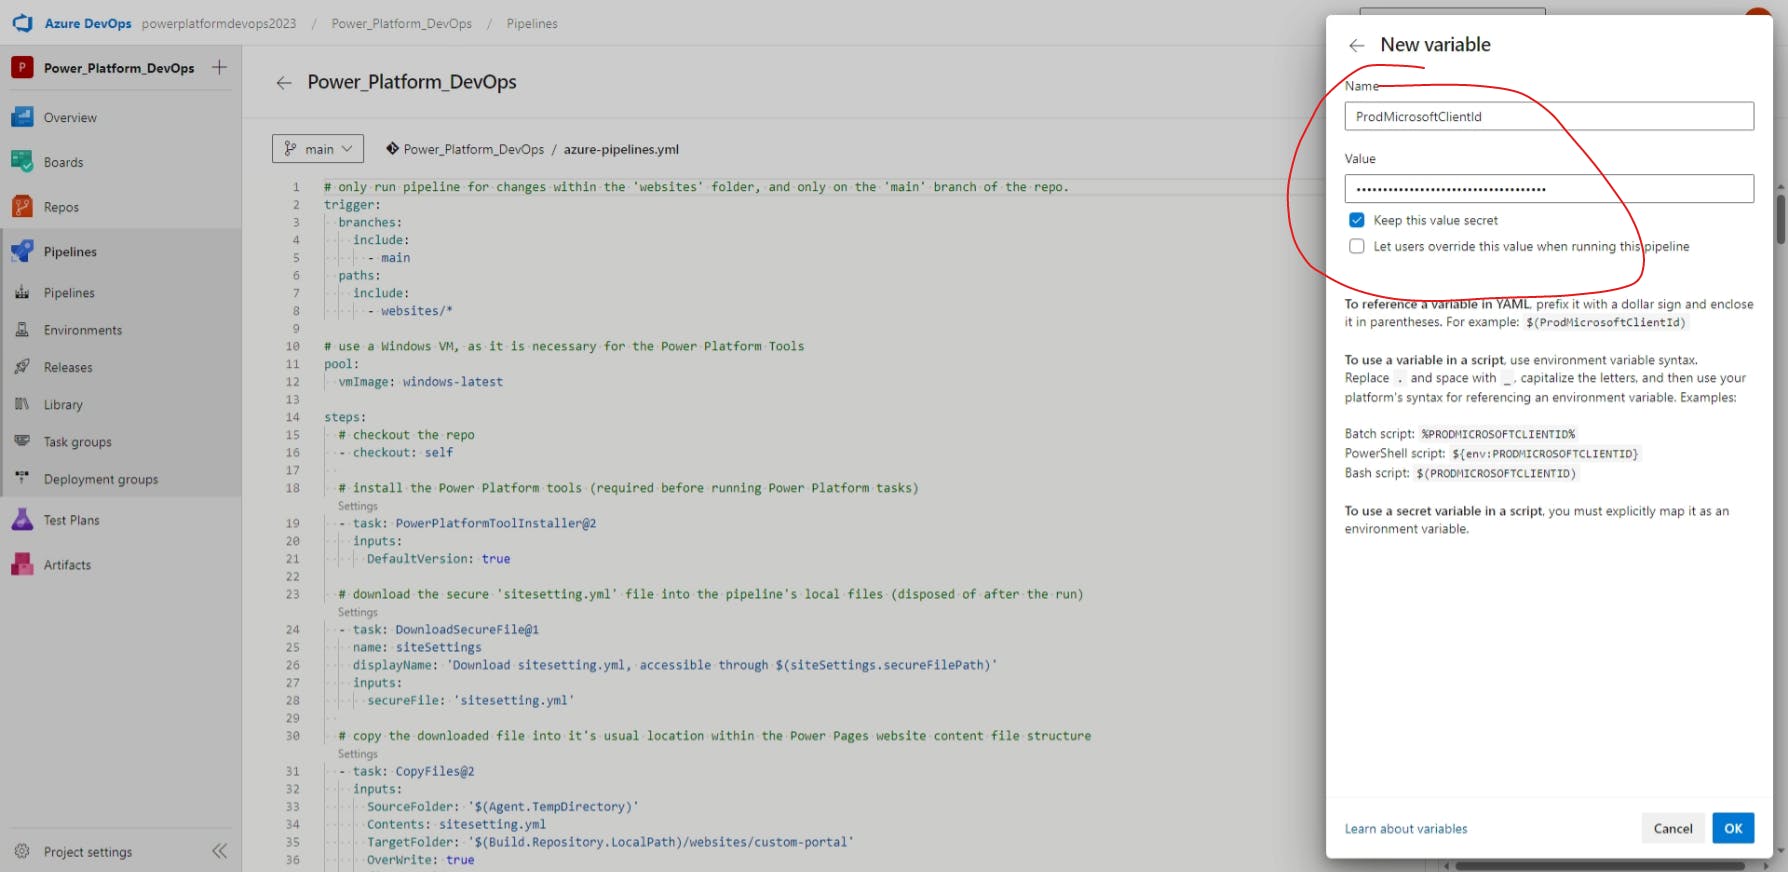
Make sure to choose Keep this value secret for added security, as this will prevent anyone else with access to the pipeline from seeing the value. Once the variable has been added, be sure to hit Save.
With that saved, let's repeat the process for the Microsoft client secret, which we'll store as "ProdMicrosoftClientSecret", like so:
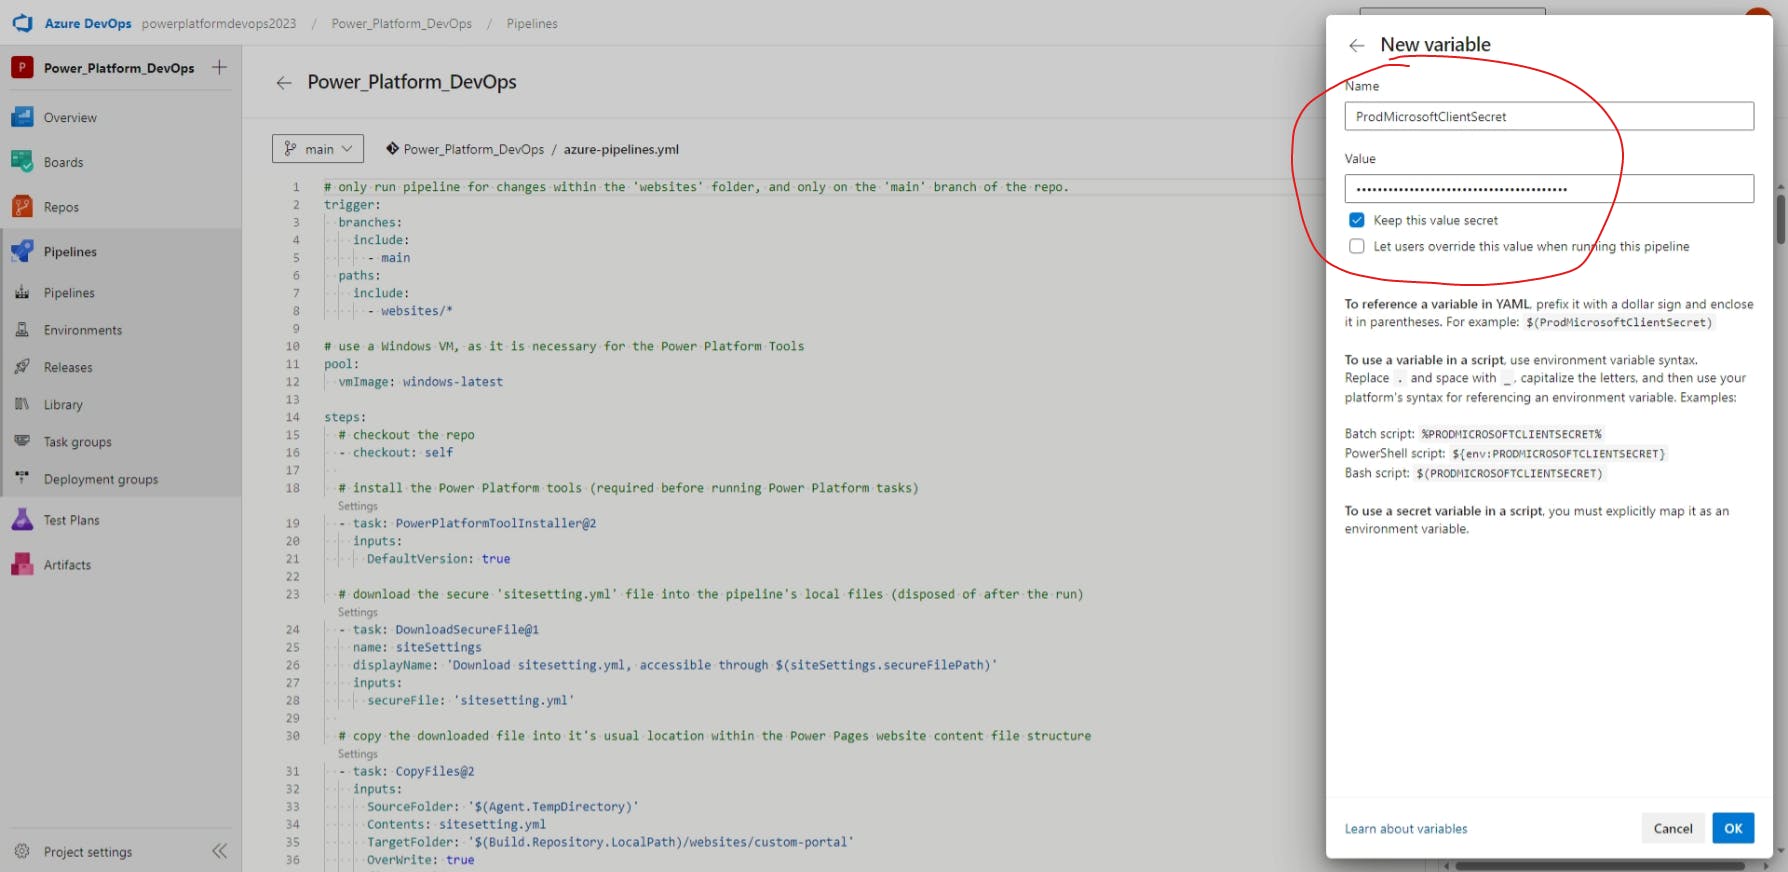
Now we have the variables saved into the pipeline, but in order for us to access them, we need to update our azure-pipelines.yml file and create deployment profiles, which we'll do in the next step.
Configure deployment profiles
To deploy environment-specific changes to our Power Pages website, not just site settings, we need to create deployment profiles. To do this, let's go back to our code editor.
Before we make any changes, make sure to run git pull origin [branch-name] to update your local repo with the new azure-pipelines.yml file that we created inside Azure DevOps.
Next, within the directory for our website (i.e. ~/Documents/Power_Platform_DevOps/websites/custom-portal), create a new folder named deployment-profiles. It must be named that, as Power Pages will look for that folder once we tell it to use a deployment profile. Within that folder, let's create a file named prod.deployment.yml containing the following code:
# make sure to replace square brackets with actual values (remove square brackets)
adx_sitesetting:
  - adx_sitesettingid: [found in 'sitesetting.yml']
    adx_value: ${OS.PROD_MICROSOFT_CLIENT_ID}
    adx_name: Authentication/OpenAuth/Microsoft/ClientId
    importsequencenumber: 5
  - adx_sitesettingid: [found in 'sitesetting.yml']
    adx_value: ${OS.PROD_MICROSOFT_CLIENT_SECRET}
    adx_name: Authentication/OpenAuth/Microsoft/ClientSecret
    importsequencenumber: 5
Why
OS.PROD_MICROSOFT_CLIENT_IDinstead ofProdMicrosoftClientId?Since we are within a Power Pages deployment profile, not the Azure DevOps pipeline file, we are accessing the operating system's environment variables, not the pipeline environment variables. You can read more about the differences here and here.
Now that we have our Power Pages deployment profile configured for prod, let's update the PowerPlatformUploadPortal@2 task within our azure-pipelines.yml file to include the environment variables, like so:
  # upload the website content to the target environment
  - task: PowerPlatformUploadPaportal@2
    inputs:
      authenticationType: 'PowerPlatformSPN'
      PowerPlatformSPN: 'prodsite'
      UploadPath: './websites/custom-portal'
      DeploymentProfile: 'prod'
    env:
      PROD_MICROSOFT_CLIENT_ID: $(ProdMicrosoftClientId)
      PROD_MICROSOFT_CLIENT_SECRET: $(ProdMicrosoftClientSecret)
This change allows us to access the Azure DevOps pipeline environment variables from within our deployment profile.
With that change, we can now run the following commands to send our changes to Azure DevOps, which will automatically kick off the deployment pipeline!
git add .
git commit -m "Deploy site settings through deployment profiles"
git push origin main
Conclusion
Whew, that was a lot of work! The good news, however, is that now you can be confident in the fact that you have a fully-configured deployment pipeline for deploying your Power Pages website to other environments without exposing any secrets, while still maintaining the ability to make environment-specific changes as needed.
Thanks for reading and, if you found this article useful, please consider sharing it across your network so others may be able to benefit from this information.
Take care!